FileBrowsa – A Groovy File Explorer for Windows

FileBrowsa

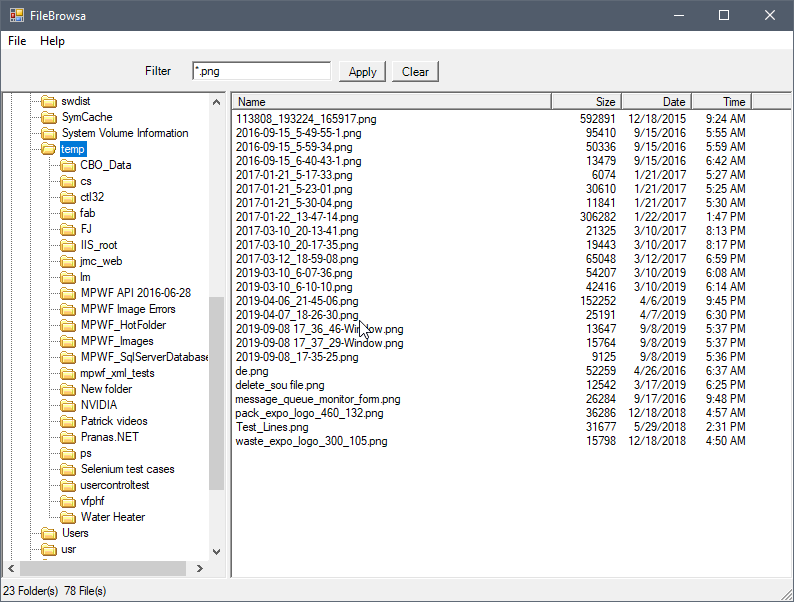
I’ve created a simple Windows app to browse files in a folder, much like Windows Explorer. One big thing about this utility is that it supports command line parameters when launching the app so you can pass the initial starting folder, and a filter or file mask expression to apply to the file list.

Inside the app, you can double-click on any filename to launch the default Windows app to open or edit the file.

The source code for this app is open-source on my GitHub account. It is a WinForms app written in C#. You can get the source code here:

https://github.com/mattslay/FileBrowsa

Once you copy the exe to a folder on your computer, you can just double-click to launch the app, but it also supports command line parameters allowing you to specify the starting folder and an optional filter expression if you want to apply a file mask to limit which files are displayed.

Command Line example:

FileBrowsa "C:\MyPath" "*.pdf"
Tags:

File Browser

File Explorer

Credit: Note: the original starting point for this app was a project I found on Code Project written by Russell Mangel.

File Explorer

https://www.codeproject.com/Articles/2316/Windows-Explorer-in-C

What percentage of the Sun’s energy hits the Earth?

This is a purely geometric-based solution of light emitting from a source and spreading out in all directions and contacting another sphere some distance away. This does not account for any fancy "scientific" stuff that I am no expert at, such as the energy getting absorbed by the Earth’s atmosphere, or other factors that may be at work in this matter.

Here are some other sources I found that address some of the scientific issues of this matter, as well as other mathematical approaches to estimating this value:

https://www.quora.com/What-percent-of-heat-from-the-sun-reaches-the-earth

https://web.extension.illinois.edu/world/energy.cfm

  • Step 1

    Surface area of a sphere: A = 4πr^2

    r is the distance of the Earth from the Sun = 92,960,000 miles (92.96 million miles)

    Surface area of the "sphere" formed by this distance:

    Area = 1.09×10 ^ 17 square miles
    
  • Step 2:

    Cross-sectional area of a sphere: A = πr^2

    r = radius of earth
    r = 3,958.8 miles
    A = 4.92×10 ^ 7 square miles
    
  • Step 3:

    Divide Area of Earth by Area of Sphere:

    (4.92×10 ^ 7) / ( 1.09×10 ^ 17 )
    
    = 4.5137615e-10   =  4.5292×10^-10
    

    For reference, "1 Billionth" is 1e-9, so 4.51e-10 is even less than this…

    Basically, it’s "Less than 1 billionth"

    It could also be stated as 4.5 "10 billionths"

    = 0.00000000045137615  =   0.000000045137615 %
    

Old BBS list from Birmingham, AL (circa 1994)

Here’s an old list of BBS bulletin boards I found on an old hard drive I was filing away. These are from the Birmingham, Alabama area around mid-1994.  I probably used many of these at the time, although I can only recall a few of them.  Man, those were the good old days!

See how many you can remember:


Using Hyper-V Manager to remotely connect to a Windows Hyper-V Server 2016

Scenario: You want to use Hyper-V Manager from a domain-joined Windows 10 Professional client computer to connect to a Windows Hyper-V Server 2016 which is a Workgroup computer (i.e. not domain-joined).

I struggled for a couple of hours with this configuration, and read plenty of googled blog posts about how to do it. I wrote this post to document, the exact steps I finally followed to get this working as simply as possible.

(This post deals strictly with Windows Hyper-V Server 2016 and Windows 10 Professional,  so do not assume these same steps work on Hyper-V Server 2012 or any prior version of Windows client OS prior to Windows 10.)

Let’s start with the Server

I’ll assume you’ve installed Hyper-V Server 2016 (the free thing from Microsoft which can host Hyper-V virtual machines. This is a non-GUI install of the Windows Hyper-V Server OS, and while you can administer it from the terminal window on the server, most people will want to manage it remotely from a client machine using Hyper-V manager GUI tool from another client machine running Windows 10 Professional or perhaps a full Windows Server 2016 machine.

After installing, I left mine as a Workgroup computer because I did not want to join it to a domain, at least not just yet.

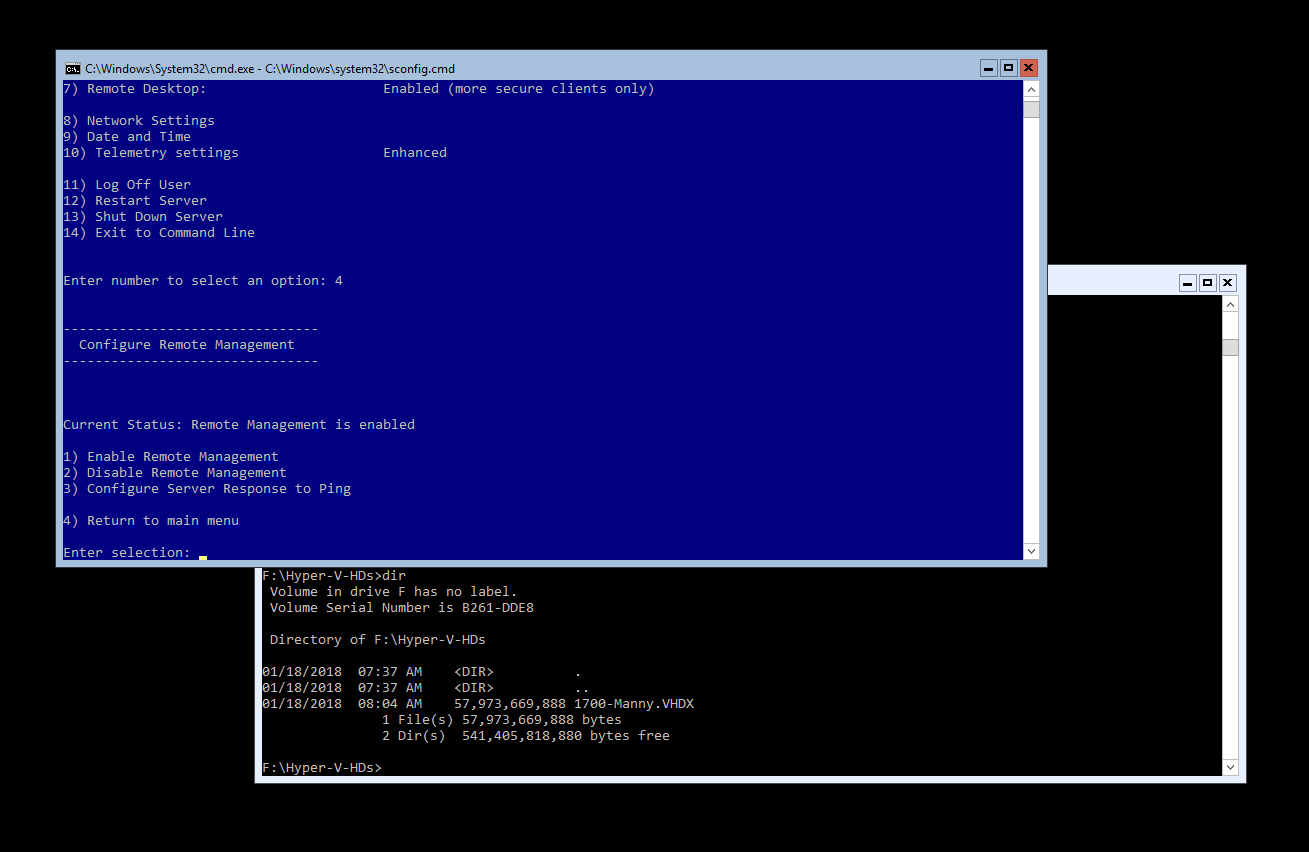
I’ll leave the basic setup from the blue sconfig.cmd screen up to you. I’m not going to walk you through all these baby steps in this post. The bottom line is that once you’ve enabled Remote Management and Remote Destkop, you can RDP from the client machine into the server (using the server IP address until you add fqdn in the your client hosts file later).

Your server “desktop” should look like this:


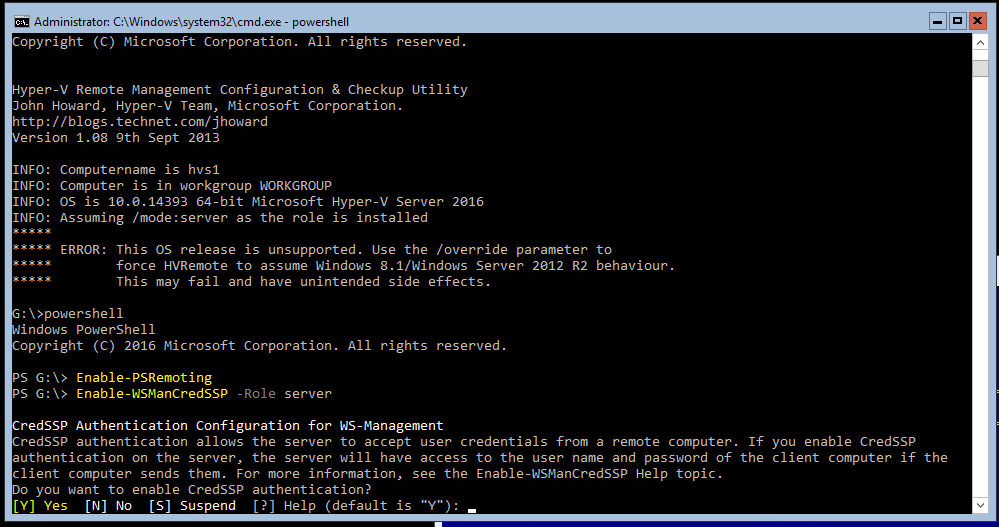
From Powershell window at Server:

1. Enable-PSRemoting

2. Enable-WSManCredSSP -Role server

Next, still in PowerShell command window:

(From: https://www.ivobeerens.nl/2015/08/28/manage-hyper-v-in-a-workgroup-remotely/)

3. Set-NetFirewallRule -DisplayGroup 'Windows Management Instrumentation (WMI)' -Enabled true -PassThru

4. Set-NetFirewallRule -DisplayGroup 'Remote Event Log Management' -Enabled true -PassThru

Finally, from the blue sconfig.cmd menu on the server:

5. Enable remote ping from clients to server:
From sconfig.cmd menu on Hyper-V Server 2016, select:
“4) Configure Remote Management” then
“3) Configure Server Reposonse to Ping” and select to enable this feature.

You should now be able to ping the server from any client machine on the next.  Go to command window on a client machine and test Ping 192.168.0.55 (or whatever IP address you assign to your server.

Now setup the Client machine

(again, this assumes a Windows 10 Professional computer, domain joined)

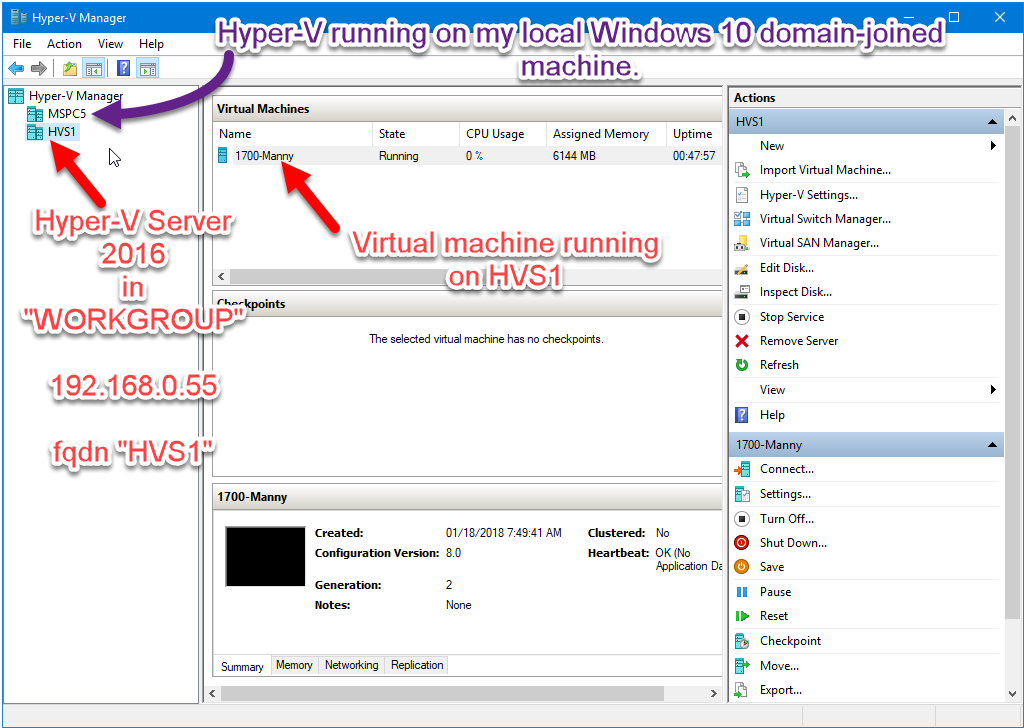
In my case, ServerName was “HVS1”, IP address of server was 192.168.0.55

1. Edit the “hosts” file in C:\Windows\System32\Drivers\etc\hosts, add this line at the bottom:
192.168.0.55 HVS1

The above two values represent the IP address of the server and  fqdn ServerName of your server. Modify values per your sever details.

2. Enable-PSRemoting  (From Powershell admin console)

3. Modify a Group Policy setting:

Run gpedit, then:

Computer Configuration >
Administrative Templates >
System >
Credentials Delegation >
Find:  “Allow delegating fresh credentials with NTLM-only server authentication”
Click Enabled, then, add an entry in the server list as follows (use the Show button to get a popup grid where you can enter this entry below):
add wsman/fqdn-of-hyper-v-host (i.e. wsman/HVS1) (Remember to enter “wsman/” before the computer name.)

4. Set-Item WSMan:\localhost\Client\TrustedHosts -Value "HVS1" (From Powershell admin console)  Click YES when you get a security warning explaining what setting changes you are making.

5. Enable-WSManCredSSP -Role client -DelegateComputer "HVS1" (From Powershell admin console) Click YES when you get a security warning explaining what setting changes you are making.

Now connect to remote Hyper-V Server from your client machine using Hyper-V Manager

Open Hyper-V Manager,
In the left pane, right-click Hyper-V Manager,
Click Connect to Server.
Select “Another Computer”
Enter HVS1 (i.e. the fqdn-of-hyper-v-host)
Check “Connect as another user” checkbox.
Enter username:  HVS1\Administrator  (Remember to put “ServerName\” before the username
Enter password: (the admin password on server)

Final step to moving a VM from a domain-connect Windows Server 2016 to a Workgroup-based Hyper-V Server 2016 machine.

So after getting all the above setup, I learned you cannot Live Migrate from a domain-connected Hyper-V to a Workgroup based Hyper-V Server.  So, I thought I take the next easiest route and simply copy the .vhdx file to the new Hyper-V Server I created… But then after building a new VM in Hyper-V Manager and attempting to attach the .vhdx disk image, it will fuss as you and tell you that the VM Machine you are working with does not have access rights to open the .vhdx file that you copied over.  After some googling, I found I was not the only one to ever have this problem, and several blogs posts outlined the fix… When creating the new VM, just tell it you will attach the .vhdx file later. This will get the VM created and Windows will give it a unique GUID Machine ID (you will need this GUID in the next step below). Next you go to an elevated command window (not Powershell) on the Hyper-V Server, and use the “icacls” command to grant permissions of the Hyper-V machine GUID to the .vhdx file. Follow this blog post:

http://www.cryer.co.uk/brian/windows/hyper-v-server/help_failed_to_start_vhdx_general_access_denied_error.htm

To find the VM Machine ID, you can follow the simple instructions on this post: https://www.petri.com/get-hyper-v-virtual-machine-process-id-and-guid 

So, here is the command I ran to get my copied-over VM working like a charm on the new Hyper-V Server machine:

Using Computer Management on a client machine to remotely access the Hyper-V Server

You can run the Computer Management tool from a client machine to remotely access the Hyper-V Server with a graphical interface. If you want to use the Disk Management node in the Computer Management tool, you’ll need to enable some firewall rules on *both* the Hyper-V Server and the client machine. (Note: the “client machine” could be one of the Windows Server VMs you are probably running in Hyper-V Server).

Credit to this blog post for answering how to do this: https://social.technet.microsoft.com/Forums/office/en-US/cbdbcf92-d697-41d1-aa7a-bacf34bd48a5/remote-disk-management-rpc-server-unavailable

You can run these PowerShell scripts to enable the required firewall rules (remember, you have to do this on the client machine and the Hyper-V Server):


*** (Update 2018-05-10) ***

CAUTION – May 2018 Windows 10 updates can cause problems

Watch out folks… Some of the Windows 10 updates between March 2018 and May 2018 add some new credential stuff to Windows 10, and if the Hyper-V Server 2016 is not also patched up the the same (or corresponding) level, you will get authentication errors trying to connect to Hyper-V Server 2016 from Hyper-V Manager on Windows, and it will even prevent RDP access from Windows 10 to Hyper-V Server 2016.

The issue is referred to as “Windows 10 RDP CredSSP Encryption Oracle Remediation Error Fix”

The error message will look something like: “An authentication error occurred – This could be due to CredSSP encryption oracle remediation”

So, you can fix this by updating/patching Hyper-V Server 2016 to the latest/correct versions, *or*, you can basically disable (or at least reduce) this new security/credential stuff in your patched Win 10 machine by following the instructions on this blog post:

(click image to follow link…)

Windows 10 RDP CredSSP Encryption Oracle Remediation Error Fix

There is also more info here which dives in deeper as to what the issue is, and when it ocurrs:

https://blogs.technet.microsoft.com/yongrhee/2018/05/09/after-may-2018-security-update-rdp-an-authentication-error-occurred-this-could-be-due-to-credssp-encryption-oracle-remediation/


Good luck to you!

How Thor checks and distributes new versions of tools in FoxPro

In this post I will explain how Thor checks for new version and distributes tools from VFPx community like GoFish, FoxCharts, FoxyPreviewer, etc.  I was involved with Jim Nelson at a pretty low level when all this distribute/update goodness for FoxPro via Thor was first being developed. I have emails dated October 2011 where we were working on this, so 6 years ago as of this post in October 2017.

First, look in the Thor Updates folder of your Thor installation. On my machine the Path is:

C:\Fox\Utils\Thor\Thor\Tools\Updates

In this folder, you will find an updater prg for each tool that is available from Thor. In this case, for the FoxyPreviewer app:

Now, open that file and have a look… In this file, you will see it contains all the info that the Thor update engine uses to check for updates and download a tool.

In this case, the current version that Thor publishes ver ‘v2.99z30’ and it pulls the zip file from this website, which is owned by Rick Schummer, and Jim Nelson (along with a few others I think) have FTP access to this server to post the latest ZIP file.

ZIP location:

So, to get a tool updated, Jim has to do 2 things:

  1. Distribute an updated updater prg which will be pulled down when the user from Thor Check For Update. So, he sends out an updated Thor_Update_<<ToolName>>.prg with the new . VersionNumber (or the updater pfg may use a .VersionFileURL property which points to a file on the server which has the new version number) , and a .SourceFileUrl property which has the URL location of a zip file on the server which all the app file in it. Users will see all available updates for any of the Thor distributed apps in the CFU grid.

  2. He, or the tool author, must also post the referenced ZIP file to the server (usually an ftp server at a web hosting account) at the URL path referenced in the updater prg.

With these two things in place, lots a black magic happens (or, white magic, since it is Jim, and he is a good fella by most accounts), and users will see that a new update is available, and if Jim has been living right, it will download and unzip to the users local Tools or Components path in the Thor folder.

Here is the code in thor_Update_FoxyPreviewer.prg

Helpful Windows Admin Tips


To launch Windows Update from the Windows Run dialog:

ms-settings:windowsupdate


Use Powershell to kill processes with a name filter:

Get-Process | Where-Object {$_.Path -like "*SOME-FILTER*"} | Stop-Process


See what time computer was booted up:

net statistics server


Restart or Shut Down a Remote Computer and Document the Reason

shutdown /i

(from https://technet.microsoft.com/en-us/library/cc770416(v=ws.11).aspx)


Using DISKPART from the command line to work on disk drives, volumes, partitions:

https://www.digitalcitizen.life/command-prompt-advanced-disk-management-commands

http://searchwindowsserver.techtarget.com/tip/Using-Diskpart-to-create-extend-or-delete-a-disk-partition


Activating Windows 10: https://www.howtogeek.com/245445/how-to-use-slmgr-to-change-remove-or-extend-your-windows-license/


Changing Windows Product Key After Install: http://tweaks.com/windows/39026/change-windows-product-key-after-install/


Windows Search error: “Search results aren’t quite ready yet, but we’re working on getting them together. Try back in a few minutes.”

https://www.weavweb.net/2016/12/19/search-results-arent-quite-ready-yet-but-were-working-on-getting-them-together-try-back-in-a-few-minutes/


Read original Windows 10 License Key using Power Shell:

Then, read Windows Key from “OA3xOriginalProductKey” property from output above.

(from https://gallery.technet.microsoft.com/scriptcenter/Get-windows-10-digital-7653fae4)

See also: https://robertsmit.wordpress.com/2017/03/19/get-windows-10-digital-license-with-powershell-winserv-osd-wds/


PowerShell: Get a list from the registry of all the software installed on your machine


PowerShell: List open files on a server/computer

Example with filename filter:

Example with domain\username filter:


Debugging Angular2 apps in Visual Studio Code

I couldn’t debug TypeScript from my Angular 2 app files at first…

but then I got it working. Here’s how:

(Note: The environment used here was Windows 10 and a beginner Angular 2 app cloned from the Angular Quick Start repo from the Angular Github repo. If you’re on a Mac or Linux system, I can’t say whether the solution presented he will work for those environments.)

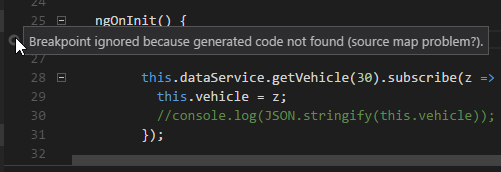
This post explains my trouble (and solution) of using the the Microsoft VS Code Debugger for Chrome extension to debug my first beginner Angular 2 app from within VS Code.  I let VS Code create the default launch.json  file that is required (details in this link: https://code.visualstudio.com/docs/editor/debugging) , but when I started the debugger from inside VS Code, and I put a breakpoint on a line of code in a TypeScript file (.ts), VS Code complained that it could not find the corresponding .js file (therefore it could debug from the .ts file), and it put a little gray circle beside the line of code, instead of the typical red dot, with a warning:

“Breakpoint ignored because generated code not found (source map problem).”

When searching the web about this issue, all of the suggested launch.json code examples from various posts I found all looked very similar in what they suggested was required to fix the issue, but I never could get any of them to work for my app / dev environment. But, I finally found one that did work for my beginner Angular 2 project, which I had begun by cloning the Angular 2 Quick Start repo.

I found the magic solution for me in one user’s example that he posted to an issue on the VSCode GitHub project: https://github.com/Microsoft/vscode-chrome-debug/issues/367 and again the issue of where the generated .js and .js.map files are located (in a Windows environment) is addressed in this issue: https://github.com/angular/angular-cli/issues/1223

Now it works!

Here’s the part from his included code that worked for me:

IMPORTANT: Kill all current VS Code and Chome instances to start fresh.

After making this change to my launch.json, I made sure to kill all existing VS Code instances and all Chrome instances. Then I used npm start  and then I started the debugger from inside VS Code. It then launched its own instance of Chrome to start my app, and finally, VS Code debugger was able to trace into the .ts code because it was finally able to find the generated .js code.

.gitignore changes

I also found that I needed to add two folders to my .gitignore  file:


Configure Windows Defender using PowerShell

References

I found these 2 links very helpful and informative which explain how to use PowerShell commands to observe the current setting of Windows Defender and make configuration changes such as disabling and enabling, and how to add exclusions on certain apps.

#1

http://www.thomasmaurer.ch/2016/07/how-to-disable-and-configure-windows-defender-on-windows-server-2016-using-powershell/

#2

and this one, which has a short but helpful video: http://www.netometer.com/blog/?p=1579

Add Windows Defender exclusion for iBackup exe

In my case, I wanted to add an exclusion for the iBackup exe which runs nightly to do a local disk backup to another drive on the same machine, and Windows Defender was watching every file write operation in real time, and this made the backup take a very long time. So, I added an exclusion for the iBackup processes exe using this command, and it sped up the backup tremendously:


Doctor of Code