There’s a new way to Install Ruby and Rails on a Windows Machine
I wanted to make a small post to point you curious Windows developers over to the new Rails Installer for Windows web site (approx January 18, 2011), which was recently put online by Engine Yard, and is headed up by Wayne Seguin, the author of the popular RVM gem. The site shows three simple steps that will have your Windows box up and running with Ruby and Rails in just a few clicks. There is even a brief 3-minute video showing you just how simple it is to follow the steps and generate your first Rails 3 app in just minutes.
Next, you need an editor…
I think what the did is great; however… I think the stopped one step too soon. They get Ruby and Rails installed on your Windows machine, and show you how to generate your first app, but they stop short of showing you how to edit the Ruby and Rails source code files to actually finish building an app. Most hard core Rails devs are Linux or Mac users, and they eat, breathe, and sleep in a terminal window or some other (weird) text editor to do the actual coding. By now in my coding career, I know that every dev has his or her own favorite editor, and that’s fine; I have my own favorites too. You could go really hard-code on the Windows platform and use Notepad plus an Explorer window. However, I think that if a new Rails on Windows users does jump on board, they will come out better choosing one the available code editors or IDEs to make their coding experience better.
You can gain a lot of insight about a Rails app just by seeing a visual of the folder structure that you get in a generated rails app. That’s the first thing you need to get your brain around as you start studying Rails. From the folder structure, you will edit the code for various Rails resources (i.e. the Models, the Views, and the Controllers), as well as a handful of config files for a Rails app.
You should check out each of these to see which one you like best: Ruby Mine IDE, RedCar, NetBeans, Komodo IDE, E editor(similar to TextMate)
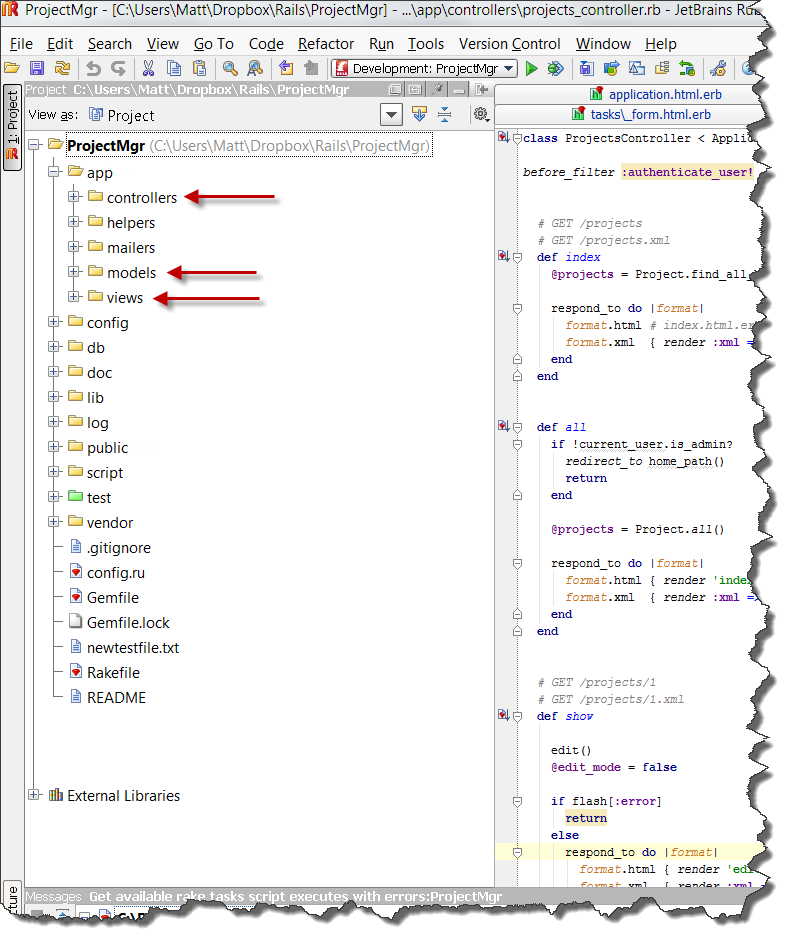
So, finally, here’s a screen shot of the folder structure for a basic Rails app. (What you see here is in my RubyMine IDE). Those 3 red arrows point to the main folders for Models, Views, and Controllers. You’ll spend a lot of your time working on files in these folders. Also, notice that these folders are subfolders of a folder named “app”.

So, be prepared to study the various Rails IDE or editors. My personal favorite is RubyMine.
So, check out the Rails Installer for Windows at http://railsinstaller.org/ to start your journey on the Rails path to coding goodness.

Thanks for the info. I do not agree with you about the IDE. RubyMine not free. Should be the last. Free IDE’s in my opinion the best is netbeans because it helps me find errors while editing. Another very good is RadRails. The rest are basically language editors.
NetBeans? Bad choice! They just announced that they are stopping development for Ruby on Rails in NetBeans. Read about it here: http://mattslay.com/ruby-on-rails-support-discontinued-in-netbeans-ide/
They announced that will discontinue the support for Ruby TODAY for Netbeans 7.x! Netbeans 6.x still remains in use for application development ruby on rails.
You’re gonna stick with an old dead dog? What are you going to do when Rails 3.1 comes out and your version 6 NetBeans IDE can’t fully work some new features or something? Switch to RubyMine, friend. You’ll at least have an active community to chat with.
Yes, it cost money. “You get what you pay for.”