Sublime Text 2 syntax coloring for FoxPro code

I’m constantly reviewing text editors for coding in various programming languages and environments. Recently, Sublime Text 2 has gotten a lot of buzz, so I decided to give it a try, and I eventually wound up testing it on FoxPro code.

It’s got a nice Folder View panel on the side, tabbed edit windows, and tons of cool keyboard shortcuts for doing fancy editor tricks, but the first thing I missed was seeing the beautiful FoxPro language in colorized syntax. So, I dug in to learn how to write a syntax file and added all the keywords that are used in the semi-popular NotePad++ syntax file…

You can download the latest version and read instructions from my GitHub repo:

Sublime-Text-2-Syntax-Coloring-for-Visual-FoxPro

Here’s what it looks like so far:

image

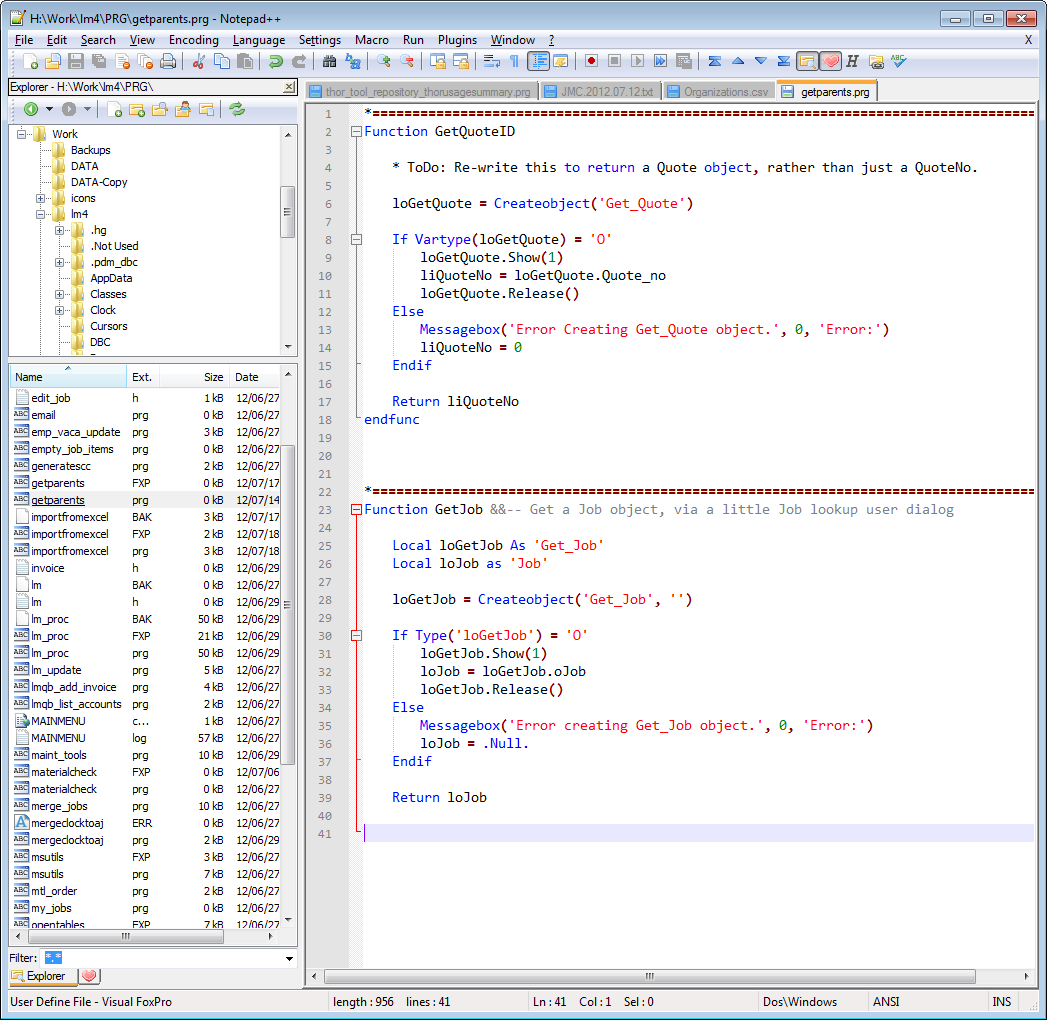
To be fair, the same thing is possible in NotePad++, it just doesn’t look as cool:

SNAGHTML244a2173

Hosting your own Rails apps

Sometimes the current options for paid hosting of Rails apps are just not warranted for small scale apps. Imagine a small business app where there may only be 10 or 15 users across the whole country. These are small, but very real CRUD apps that need to be accessed from a web browser by remote users, it’s just that the user count may be small. Let’s face it, not every site in the world gets a million hits a second, right?  Sometimes the cost of paid hosting options is too much for these little apps, which can cost $50 to $75 a month even for the smallest hosting package. For big corporations this is no big deal, but for small mom-and-pop companies or small organizations, it’s still too much.

So, being a simple and frugal guy, I have been able to successfully host a few of these small, private login apps right in an Ubuntu Linux virtual machine that I am running inside of a Windows XP box sitting right on my local network.

Yep… A Windows XP machine running Virtual Box which has Ubuntu 10, where I used RVM to install Rails and all the Gems for the app. Then I go to a terminal window and start up the Rails development web server on a certain port, and leave it running. In most cases, the database is SQLite, but you can use anything that you can get running in your development environment. SQLite is plenty powerful enough for this small user-count scenario, even if the database is or becomes large (1GB, 5GB is no problem for SQLite). 

Most of my apps do user authentication to validate the users at login. Myself or an admin for the app are the only ones who can create user accounts . The total number of daily users is usually less than 20 or so, and it is not open to public signup. It’s a low volume, privately accessed app.  So, the developer environment of a simple Ubuntu / Rails machine handles it very well. The users have no idea what is happening on the back end.

I have the XP machine on a battery backup, and I have a static public IP with my business-grade internet service provider.

To handle the hits, I redirect from my main public facing router (switch) to the LAN based IP and port which the Ubuntu VM uses.

So, my users enter an address like this to hit their app (notice that a specific port is requested):

(the above is a fake address, but you get the picture)

When this hits my public facing router, I redirect  it to the Ubuntu Virtual Machine LAN IP and the port that I used when I started the Rails development server:

So, with this mapping in place, I go to the virtual machine and open up a terminal, CD to the Rails app directory, and enter:

to start up the server on port 3003. (You can use any free port that you have available.)

image


Boom! A live self-hosted Rails app. 

You can run as many of these as you want. Even in the same VM you can run different ones just by change the port that is used for the Rails server, and then just create a new mapping on your switch.

Sure, since I am using SQLite, it’s single threaded hits to the database file, but hey, for what little traffic this thing gets each hour, it handles it very easily, and the users never feel any speed issues.


Pros: Free, full control, hands-on, dang… it just works! Trust me, I’ve been doing it for months!!!

More Pros: Because it’s a VM , about 20GB is enough size, and you can backup or clone the entire machine as a single file.

Cons: Keeping the host XP machine and the VM alive all the time, keeping my internet connection alive, keeping the Ubuntu updates applied (if needed), backing up the data file(s).

Need to hire a Visual FoxPro consultant in Alabama?

I’m a long time FoxPro programmer and I know lots of good developers in the Visual FoxPro business software space. The power of Visual FoxPro software will live on for many years!!

While I’m not available for FoxPro projects, I highly recommend my friends at Red Mountain Solutions group in Birmingham, AL if you need support in this area.

They offer expert FoxPro development work and maintenance on existing software, as well as web development and overall IT support.

You can reach them here:  http://www.RedMountainSolutionsGroup.com/


Installing RubyMine 4 on Ubuntu 12.04

I recently set up a new Ubuntu 12.04 machine in a VirtualBox VM. After installing the basic RVM, Rails, and Ruby stuff, I was then ready to install RubyMine. (By the way, see this post where I explain how to setup the Rails goodness on a new Ubuntu 12.04 machine: http://mattslay.com/installing-rails-on-ubuntu-12-04-with-rvm-support/ )

Installing RubyMine

There is no actual “installer” for RubyMine on Linux. You just extract it to a folder of your choice. (I put mine in /home/matt/apps/RunyMine-4.0.3/). If you try to place it in one of the more locked-down system folder, you could run into permissions problems, which always drives me nuts. So I just create and “apps” folder in my Home folder, and drop all my non-Ubuntu-Software-Center packages in separate folders there.

You can read the RubyMine Installation Instructions in the file named “Install-Linux-tar.txt” file which is located in the archive file for RubyMine that you will download from JetBrains. (http://www.jetbrains.com/ruby/download/).  It will tell you where to unzip the files, and how to launch RubyMine after you’ve extracted it from the archive. (Note to Windows users… All this talk about “tar” and “archive” is basically what us Windows folks call a “zip” file.) After you download the archive from the JetBrains site, right click on it and open it with the Archive Manager. From there you can extract it to a folder of your choice. After that, it’s ready to run RubyMine (well, after you follow the next step…)

Sun Java JDK

RubyMine requires the Sun Java JDK environment to make its fancy GUI stuff work (note: RubyMine does not work well with OpenJDK, so don’t use this one by mistake!). Unfortunately, the Ubuntu Software Center does not have a click-easy installer for this, so you’ve got to do it in a terminal window, but trust me, it’s not hard. I followed this guide (from a Question/Answer on StackOverflow) to install the Sun Java JDK 1.7.0 in my new Ubuntu machine:

http://stackoverflow.com/questions/10178601/rubymine-on-linux

Note: This step can be done before or after you extract RubyMine from the .tar download. It’s just that RubyMine will give you an error if you try to run it without having the Sun Java JDK installed.

Done!

With Rails and Ruby installed (see link at the top of this page) and RubyMine extracted, and Sun Java JDK installed, you are ready to ride on the Rails train.

Installing Rails with RVM support on Ubuntu 12.04/12.10 or Linux Mint 14

Here’s a link to a really complete post on preparing your Ubuntu machine for Rails development:

http://railsapps.github.io/installrubyonrails-ubuntu.html

The above link by the awesome Daniel Kehoe should be all you need to get Rails running on your Ubuntu machine, but I’ve left the information below as a record of how I previously prepared my Ubuntu machines for Rails development. As of 2013-03-18, these instructions also worked well on a new Linux Mint 14 install box (which is based on Ubuntu 12.10).

I mostly followed this guide “Installing Ruby on Rails on Ubuntu 12.04from The Tech Journal, which worked very well, except for the RVM instructions did not work for me.

Since I had a trouble installing RVM per the instructions in the above post, I followed the basic install instructions directly from the full RVM site:

https://rvm.io/rvm/install/

Install RVM/Ruby dependencies

Next, from the terminal window, type:

RVM will show you a list of dependencies that need to be installed. So, run the sudo apt-get commands shown (copy and paste them in the terminal window) to prepare the environment for rvm, ruby, rails development.

Install a version of Ruby:

I can’t tell you which version(s) you’ll want or need, but this how you will install them.
You can get a list of available versions with this command:

You’re on you on from here…

Create a RVM gemset, then install your desired Rails version and any other gems your app needs. You’ll probably use the “bundle” command to pull in the required gems from a gemfile. From here on, it’s basic Rails stuff.

Other crap I’ve had to deal with if something goes wrong….

http://stackoverflow.com/questions/9056008/installed-ruby-1-9-3-with-rvm-but-command-line-doesnt-show-ruby-v/9056395#9056395

Oh, yeah, one more final point about (not) installing gem docs…

I always like to turn off the documentation downloads (rdoc and ri) when installing new gems (I never read the docs locally this way, I always use the web). You can make a permanent change on your system to *not* install gem documentation when installing new gems. Run this line in the terminal window:

This will create a .gemrc file in your home folder telling the gem installer not to download the docs when you install new gems. You only need to do this once.

Do this before you run any “gem install” commands, or use Bundler, so that it won’t waste time and space pulling down docs for the gems.

Other detailed instructions for installing a full Ruby, Rails, Apache, MySql stack

If you really want a LOOONG tutorial that also gets deep into installing Apahce, MySql, and all that jazz, check out this post which has a 35 page PDF mega walk-through.

Setting up RubyMine

If you want to install RubyMine IDE for your Rails development, you can follow my instructions here: http://mattslay.com/installing-rubymine-4-on-ubuntu-12-04/

Other goodies I installed on my new Ubuntu machine:

I installed these personal favorites right from the Ubuntu Software Center  (I’ve listed links so you can learn more about these tools, but I recommend installing them through the Ubuntu Software Center right inside of Ubuntu):

If you’ve got favorite Linux/Ubuntu tools that you think are helpful to Rails developers, please add them in the comments.

Table based definition of Parent-Child relationships in wwBusinessPro

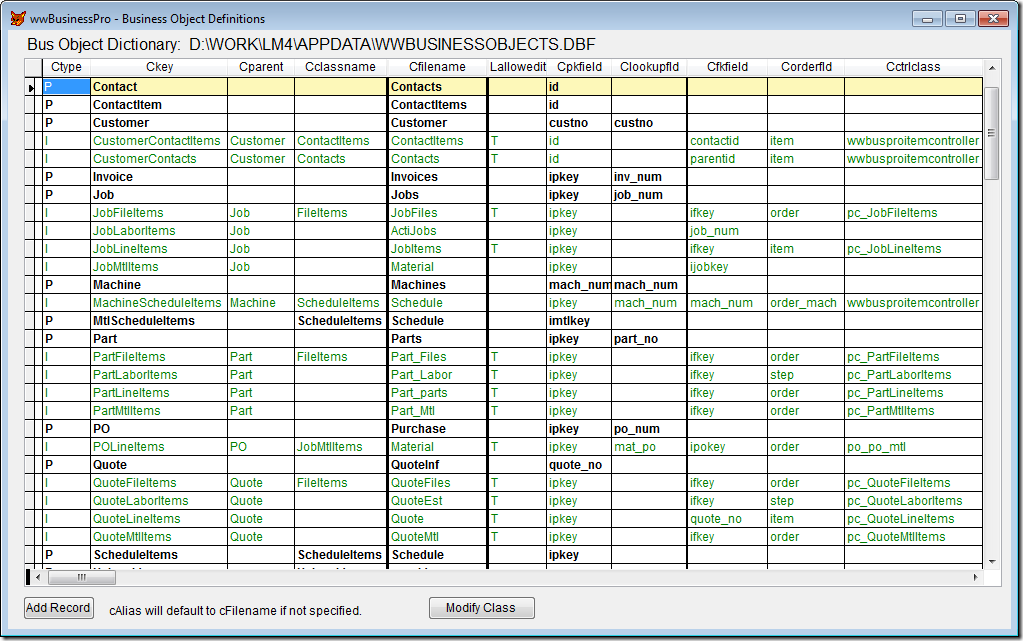
The wwBusinessPro data access library supports table-based definitions of the Business Objects used in an application. This also allows you to define Parent-Child relationships between the records and tables in your app.

You can download wwBusinessPro from the project hosted on BitBucket.org.

The default table name for the Business Object definition table is “wwBusinessObjects”.dbf”. Just make sure the Path includes the location of this table, and run the form “wwDictionary.scx” to open and edit the rows in this maintenance form.

Here is a screenshot of the Business Object Dictionary form included in wwBusinessPro:

SNAGHTML201d0768

Manual setup steps for Devise gem in Rails

Here is the text displayed from running the configuration command line for the Devise authentication gem in rails.

Running this command:

Generates this text:

Some setup you must do manually if you haven’t yet:

1. Ensure you have defined default url options in your environments files. Here
is an example of default_url_options appropriate for a development environment
in config/environments/development.rb:

config.action_mailer.default_url_options = { :host => ‘localhost:3000’ }

In production, :host should be set to the actual host of your application.

2. Ensure you have defined root_url to *something* in your config/routes.rb.
For example:

root :to => “home#index”

3. Ensure you have flash messages in app/views/layouts/application.html.erb.
For example:

<p class=”notice”><%= notice %></p>
<p class=”alert”><%= alert %></p>

4. If you are deploying Rails 3.1 on Heroku, you may want to set:

config.assets.initialize_on_precompile = false

On config/application.rb forcing your application to not access the DB
or load models when precompiling your assets.


Installing COMCTL32.OCX and MSCOMCTL.OCX on a Windows XP Machine

I recently had to install the Microsoft Common Controls on an XP machine that had never had this stuff installed before… Probably these files were missing because this machine had never had Microsoft Office, or VB, or Visual Studio, or whatever suite installs these items.

I needed these files to run a FoxPro app that I had written which used the TreeView control from the VB6/MSCOMCTL.OCX library.

Here is what I learned and how I got it working:

Getting started

 Note: There are TWO Common Control libraries out there. You must figure out which one you need.

1. The older VB 5 Common Controls (COMTL32.OCX)

     and

2. The newer VB6 Common Controls (MSCOMCTL.OCX):

Regarding the older COMCTL32.OCX (VB5 era) versus the newer MSCOMCTL.OCX from VB6 era, one user on StackOverflow had this to say:

“The earlier Common Controls 5.0 (comctl32.ocx) has better compatibility with XP/Vista than the Common Controls 6.0 (mscomctl.ocx). I suggest using it instead” – rpetrich Aug 13 ’09 at 0:44

Step 0: Before installing either of the Microsoft Common Controls you must have the following versions of the Automation system files on your system:

OLEAUT32.DLL     2.20.4054 or greater
COMCAT.DLL        4.71 or greater
OLEPRO32.DLL    5.00.4055 or greater
ASYCFILT.DLL    2.20.4056 or greater
STDOLE2.TLB        2.20.4054 or greater

You may or may not have these files on your system already. I really don’t know how these files generally get installed on a new system; if they are part of the main OS install, or if they get installed with other common Microsoft suites. My guess is that if you have Office 97, Visual Basic 5.0, Visual Studio, Internet Explorer, or Visual C++, etc, you should already have these Automation system files.

Either way, if you do not have these files on your system, you must first download and install them as documented in the following Microsoft Knowledge Base article:

Download here: http://support.microsoft.com/kb/180071/EN-US
(Default download filename will be named Msvbvm50.exe)

1. For the older VB 5 Common Controls (COMTL32.OCX):

Follow Step 0 above.
   
Once you are sure you have the correct Automation system files on your computer, you can install COMCTL32.OCX by executing COMCTL32.EXE. This will install the following files:

COMCTL32.OCX    5.00.3828    Updated ActiveX control
COMCTL32.DEP    5.00.3828    Dependency info for Visual Basic 5.0 Setup Wizard
MSSTKPRP.DL      5.00.3714    Design-Time Stock Property Pages

The setup program does not install a *license* to use COMCTL32.OCX for development. You must already have a license installed on your system by one of the products listed in the applies to section above in order to COMCTL32.OCX for development.

Download the COMCTL32 install package here:
http://download.microsoft.com/download/win95upg/update/1/w97/en-us/comctlzp.exe

The default download filename will be comctlzp.exe.
Note: You must then unzip this exe to get the actual installable exe file.
  

2. For the newer VB6 Common Controls (MSCOMCTL.OCX):

Follow Step 0 above.

As far I could determine, there is no official download link from Microsoft for MSCOMCTL.OCX. You can find tons of free download links all over the internet, but those sites always scare me as they might contain viruses or malware.

I learned a lot about the issues around getting the files downloaded and installed here:
http://stackoverflow.com/questions/1226319/whats-the-proper-source-for-windows-common-controls-6-0-component-mscomctl-ocx
   
So, based on the info on the above post, here is what I did:

  1. Locate this file (MSCOMCTL.OCX) on some other XP machine that already has the file. Path is C:\Windows\System 32.
  2. Copy this file to the same path C:\WINDOWS\SYSTEM32 on the new machine.
  3. Register the file by running ‘regsvr32 C:\WINDOWS\SYSTEM32\MSCOMCTL.OCX’ at the command window. (Admin right are probably required.)
  4. Reboot.


If you have any corrections or additional instructions to share, please add a comment so we can get this reference as correct as possible.

Machinist wanted Birmingham, AL

Jordan Machine Company, Birmingham, AL is hiring machinists and skilled shop workers. Even those who need training for a machining career will be considered.

This recent job posting will give you a general idea of the skills we seek when hiring for our shop:

MACHINISTS needed – Major job shop in Birmingham area needs machinists and skilled shop workers. Will train if you have suitable experience in related manufacturing workflow. Desired skills include milling, lathe turning, blueprint reading, forklift experience, overhaed crane experience, mechanical maintenance, assembly experience, millwright skills. Call 205-849-5050, or fax resume to 205-849-5075.

Visit us on the web at http://www.JordanMachine.com


I love me some Instapaper, but want better searching…

I really like being able to archive links for later review, and Instaper is a new toy I’ve found to handle that nicely. I really feel like there’s a lot of cool stuff that I can accomplish with it in the future.

Tonight (Feb 9, 2012), I joined Instapaper as a paying customer so I could use the Search capabilities (searching your links on the web site is only available to those customer who sign up for the $1 per month subscriber account). But, after signing up and finally getting to use Search, it does not appear to be searching the way I was expecting… In fact, I couldn’t get the Search feature to return anything. Evar!

No results.” it said… (which is not true, in that I have links with HTML5 in the title, url, summary, etc.)

image

“No Results” ?!?!?!  What the heck is going on here? I know there are some links in my account that have this text in the URL, Title, and/or Description. Why won’t the Instapaper web site find any results?

I want to be able to do a search on the URL, Title, and Summary of the bookmarks, (not the actual contents of the link pages, which I don’t expect it to search anyway). I think most of us usually remember some keyword or tags as we save the links, so I expected to be able to search my links on the Instapaper site and search for “CSS’” or “HTML” or “GIT” or something like that to find links that I’ve stored.

So, I’m going to try to do something about this…. I’ve applied for an oAuth application token to see if I can build a better searching and filtering interface than the one they have now.

This will be a good exercise to sharpen my Ruby on Rails skills.

Boy, I sure hope they approve me…

Update 2012-02-10:

Instapaper sent me my app tokens later on in the same day. (Man, that was fast). And I found a gem on github (https://github.com/spagalloco/instapaper) that provides a nice wrapper around the Instapaper API, and I’ve already banged out a few lines of Ruby code which use the gem to connect to my Instapper account and post a few dummy links. Now I can move on the real work of pulling down all the bookmarks from an account, and providing a search/filter interface for searching through them for keywords or tags in the URL, Title, or Description.

Doctor of Code